
How to select, remove, replace, and eliminate thru-hulls and seacocks - Part 4
- Sailing Koinonia

- Jul 27, 2020
- 8 min read
Think about it. Every thru-hull is a hole in your boat. That hole has a support structure meant to safely control the ingress and egress of water. If any part of the structure fails, water will leak inside which means your boat is sinking. The sinking process may happen slowly or quickly and may be mitigated by your bilge pumps, however leaks are not okay. If left unaddressed, the problem will eventually lead to a failure at the most inconvenient time.
Even though the worst case is unlikely, it’s not a risk worth accepting. For this reason, you should be thoughtful about adding thru-hulls below the waterline and, given the opportunity, eliminate them. We recently took the opportunity to eliminate four of the thirteen bronze thru-hulls in our boat, ”Koinonia,“ which means we effectively reduced the maintenance and risk of our thru-hulls by 31%!
In this final part of our how-to series on selecting, removing, installing, and eliminating thru-hulls, we share 10 steps on how to safely eliminate a machine drilled hole below the waterline on a fiberglass boat. We’ll also share some tips and lessons learned.
Step 1 - Are you sure?
Eliminating a thru-hull is a structural job that must be done properly, so you should make sure it’s the right course of action. If you can answer ALL of the questions below in the affirmative, then proceed. If not, rethink the problem you’re trying to solve:
Is the thru-hull in question no longer necessary, including any practical way of repurposing it?
Do you have the tools and know-how to do the job properly yourself or the means to have someone do it for you?
Are you prepared to haul the boat to make the repairs?
Step 2: Determine the repair area and method
Once out of the water and having removed the thru-hull, measure:
the thickness of the fiberglass hull and
the diameter of the hole.
These are the two primary factors in determining the risk profile of the hole and therefore the method to achieve a structurally sound repair. Think of the risk as a continuum. A thin hull and small diameter hole translates to a lower risk and lower complexity repair. A large hole and thick hull translates to a higher risk and more complex repair. Since we are eliminating a machine drilled hole below the water line, it is safe to assume at least a medium risk repair.
For a medium risk hole repair, a hole of 3/4 inch diameter (or less) and a hull thickness of 1/2 inch (or less), you will only need to perform the repair from the outboard side of the hull. For every 1/2 inch of thickness in the fiberglass hull laminate, you will measure a radius 4x that thickness from the center of the hole. Mark off a circle following the circumference of the hole. In this example, the repair area will have a total diameter of 8 inches. This area should be sanded to make a concave shaped bevel at least 3/4 of the thickness of the hull and then glassed with alternating layers of 6oz fiberglass cloth and 10oz biaxial mat. The inboard side can be filled with thickened epoxy.
For a high risk hole repair, a hole larger than 3/4 inch in diameter and a hull thickness of greater than 1/2 inch, the same method as described above for a medium risk repair applies, but in addition, the repair will need to be performed to the inboard side also. With the outboard and inboard repair forming and hour-glass shape. For a 1 inch diameter hole with a hull thickness of 1 inch, your radius will be 8 inches from the center with a total diameter of 16 inches, on both sides of the hull. That’s a big repair! It is important to make sure you have room on the outboard and inboard side of the hole.
What if I don’t have the required space or access to the inboard side of the hole? The truth is, you often won’t, so here is what we recommend: do the best you can, by getting as close to the recommended diameter as possible. If you have limited diameter for the repair outboard, then plan to repair the inboard side also as a precaution. If you have plenty of diameter outboard but not inboard, then compensate by going deeper and wider with the outboard area to compensate. This is a common solution to a common problem.
Step 3: Prep and plug the hole

Make a fiberglass plug of slightly thinner thickness and smaller diameter to the hole being eliminated. This plug can be cut either from G10 stock or made by layering fiberglass wetted out with epoxy to the desired thickness and pressed until cured on a level surface with a heavy book on top. Check your boat to make sure someone didn’t keep the plugs from when the holes were drilled. We actually found all of our plugs neatly strung together and stored in the cabinet under our chart table!
Before installing the plug, clean the inner surface of the hole to remove any remaining caulk, grime, and dust. A Dremel tool is fast and efficient, followed by acetone and a dewaxing solvent to help ensure a clean surface. Once the hole is prepped, make sure the plug will fit into the hole. Once you’re sure it fits, tape the outboard side of the hole, covering it completely. We recommend using a waterproof masking tape like Scotch Painters Tape 2090 or taping up a piece of peel ply.
To install the plug, mix epoxy and colloidal silica to a peanut butter-like consistency and liberally coat the edge surfaces of the plug, including the outboard side. Insert the plug and seat it gently to avoid pushing so hard that the tape is bulging outboard and no longer fair with the hull. Keep in mind, you’re going to sand this plug back a considerable amount anyway. Some of the thickened epoxy mixture may squeeze out along the edges on the inboard side, which is a good sign. Now fill any void on the inboard side with the thickened epoxy mixture until fair with the bilge, being careful to avoid air pockets. Once the epoxy has cured for 24 hours, remove the tape/peel ply and you’re ready for the next step.
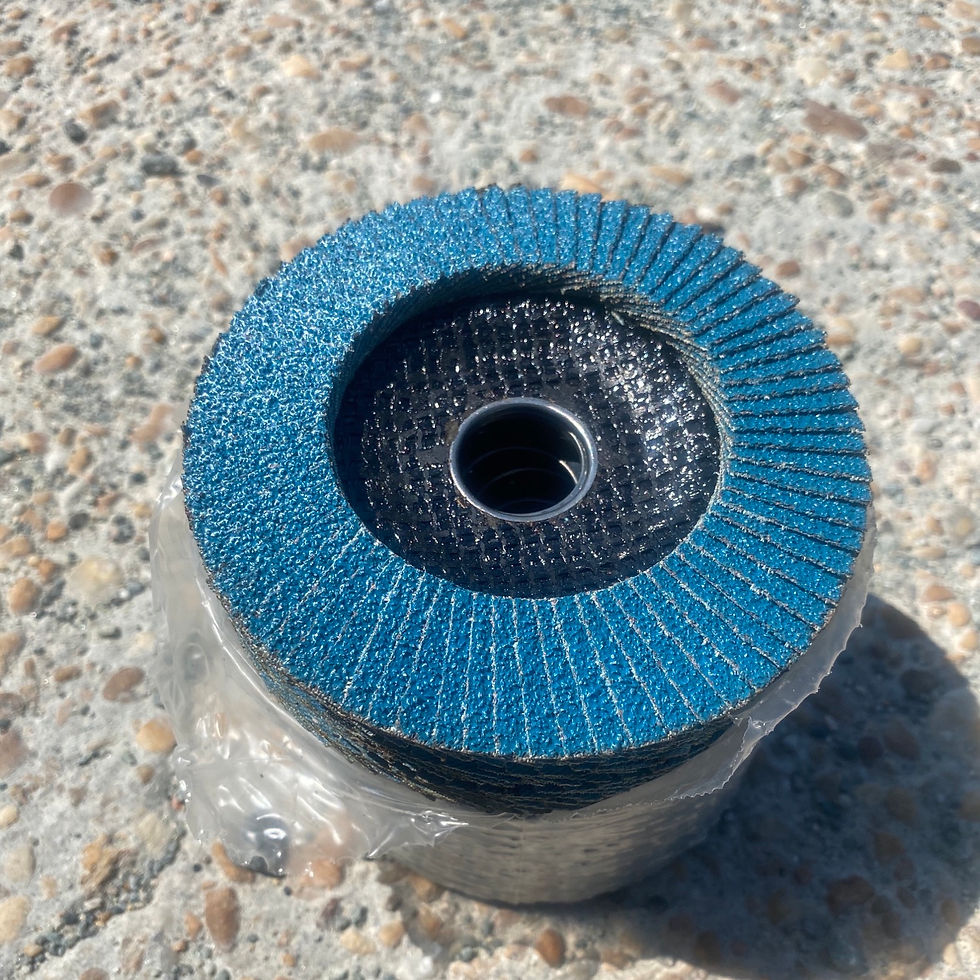
Step 4 - Prep the repair area (and wear safety gear)!
The best tool for this job is an angle grinder with very aggressive flapper disk (30-40
grit — pictured below).
Be VERY careful using this tool. I am typically very safety conscious, but in a split second, I nearly took off my right pointer finger while doing this job. I needed stitches and my injury set the project back by over a week. It could have been much worse! We highly recommend cut-proof gloves, a Tyvek suit, respirator, eye and ear protection. You will be slinging fiberglass everywhere and you do not want to breath this stuff! Also, the noise level of an angle grinder running for more than a few minutes can seriously damage your hearing.

Referring back to Step 2, you want to sand out a concave area of the appropriate diameter and depth. Begin sanding from the center of the repair area (where the plug was fitted) and sand to the target depth. Working away from the center of the repair area, gently slope the depth so that the edge of the repair area Is almost level with the hull. The slope should be as even as possible.


Step 5 - Precut the Fiberglass Cloth
We highly recommend pre-cutting the fiberglass cloth and mat into concentric circles for the repair, starting with circles only 1 inch wider than the original hole diameter and increasing by 1 inch increments until you reach the max diameter of the repair area. This will make the repair go much faster. We recommend pairing a layer of standard 6oz fiberglass cloth, which is strong but wets out very thin with a layer of 10oz bi-axial mat, which adds rigidity and makes for a faster build up.
For a 10 inch diameter repair area with an original machined hole size of 1inch, this repair calls for 9 pairs of fiberglass cloth circles (each having 1 layer of standard cloth and 1 layer of mat), starting at 2 inches in diameter and finishing at 10 inches. That’s a total of 18 fiberglass circles. The fine 6oz cloth should be used as your final top layer. We recommend marking the size of each fiberglass circle with a permanent marker.


Step 6 - Prep the Surface and Get Organized
Before starting to glass up the repair area, prep the bare fiberglass surface using acetone and dewaxing solvent. Wipe with a lint-free cloth and allow the solvent to dry completely, which should happen very quickly.
Lay out all of your tools and materials and have them positioned as close as possible to the area you are working. Having a lightweight folding table is very useful.
Pro Tip: We recommend taping a cardboard sheet to the table to protect it and then taping wax paper or peel ply to an area slightly larger than your largest fiberglass cloth circle. This way, you can use the table to wet out the fiberglass cloth before applying it on the repair area.

Step 7 - Glass up the repair area
We follow the smallest to largest circle method. This is a controversial topic. Some will argue you should go from largest to smallest. We researched this extensively and could find no clear consensus or rigorous scientific case study comparing the two methods. Reputable boat yards have been noted taking both approaches. We decided it probably doesn’t really matter. If a good technique is used to lay up the repair, they achieve the same result. We like the idea that applying the largest patch last meant that the ends of each fiberglass cloth would be covered by the next vs exposed where it might more easily absorb moisture. I’m sure someone will say we did it all wrong but we’ve had no issues.
The first thing you want to do is mix up some epoxy thickened slightly with colloidal silica and apply this to the center of the prepped repair area where the first and smallest circle will be placed. Next fully wet out each fiberglass disc prior to application with the epoxy and silica. Use a metal fiberglass roller or squeegee to ensure full saturation. Now apply the fiberglass cloth and biaxial mat to the repair area, being sure to roll with the fiberglass roller from the middle to remove air bubbles. Now alternate layers between the 6 oz cloth and 10 oz biaxial mat.
Pro Tip: If the repair area is very large and deep, it is best to lay up only half the thickness at a time to avoid excessive heat as the epoxy hardens which will cause the nice fair repair area to begin to have heat warps. Lay up only half, allowing the repair to cool before proceeding. You will need to prep the surface with 80# sandpaper and cleaning thoroughly before continuing to lay up fiberglass.
Step 8 - Keep it Fair
You need to minimize the amount of fairing and sanding you have to do after completing this repair, so don’t just blindly follow the layup schedule. Look at how level the repair looks as you layer the cloth and biaxial. If the outer edges are building up too quickly, scale back on the biaxial layers and apply only layers of the thinner 6 oz cloth. Conversely, if the repair is not building up or is concave, use more biaxial.
Step 9 - The final layer of fiberglass
Once the final layer of 6oz cloth has been applied and your repair area is completely filled, mix some epoxy and colloidal silica to a peanut butter consistency and apply over the repair area with a large squeegee. Once it is as fair as you can get it, apply a layer of peel ply that is larger than the repair area. Apply the peel ply by gently running a squeegee over it, starting from the center to the outside edges to eliminate any air pockets. Tape the peel ply in place. The peel ply has a miraculous effect, yielding an incredibly smooth and fair surface. Once completely hardened (usually 24 hours), remove the peel ply like ripping off a bandaid on a hairy leg. The faster you pull, the easier it will be!


Step 10 - Finish Fairing & Painting
Now that you’ve removed the peel ply, inspect the surface. There will generally be some imperfections. Sand the area back with 80# to fair it as best you can, then thicken epoxy with phenolic microballoon filler and apply to the areas the need fairing. Allow to set and sand until the repair is completely fair with the hull. All that remains now is to apply your favorite barrier coat, like Interlux Interprotect, and then topcoat with bottom paint.


Comments